Steganography
By the end of this lab you should be able to:
-
Explain the difference between encryption and steganography
-
Encode and decode messages using LSB image steganography
-
Detect steganography using forensic tools
-
Understand and apply text-based stego techniques
-
Reflect on steganography as a tool for privacy, security, and deception
Part 1: LSB Steganography with Images
Task 1.1: Encode a message in a PNG using encode.py
-
Firstly, create a script in a new folder called
stego/encode.py -
Open the
stego/encode.pyin your text editor of choice (I am usingvim): -
Reproduce the following code:
encode.py, 53 lines
from PIL import Image
import sys

def encode(image_path, output_path, message, bit_plane):
    if bit_plane < 1 or bit_plane > 7:
        raise ValueError("Bit plane must be between 1 and 7")

    img = Image.open(image_path)
    img = img.convert('RGBA')
    binary_msg = ''.join(f"{ord(c):08b}" for c in message) + '00000000'  # NULL terminator

    pixels = list(img.getdata())
    encoded_pixels = []

    bit_idx = 0
    mask = 1 << (bit_plane - 1)
    inverse_mask = 255 - mask

    for r, g, b, a in pixels:
        if bit_idx < len(binary_msg):
            r = (r & inverse_mask) | (int(binary_msg[bit_idx]) << (bit_plane - 1))
            bit_idx += 1
        if bit_idx < len(binary_msg):
            g = (g & inverse_mask) | (int(binary_msg[bit_idx]) << (bit_plane - 1))
            bit_idx += 1
        if bit_idx < len(binary_msg):
            b = (b & inverse_mask) | (int(binary_msg[bit_idx]) << (bit_plane - 1))
            bit_idx += 1
        encoded_pixels.append((r, g, b, a))

    img.putdata(encoded_pixels)
    img.save(output_path)
    print(f"Message encoded and saved to: {output_path}")

if __name__ == "__main__":
    if len(sys.argv) != 5:
        print("Usage: encode.py <input_image> <output_image> <message> <bit_plane>")
        sys.exit(1)

    input_path = sys.argv[1]
    output_path = sys.argv[2]
    message = sys.argv[3]
    try:
        bit_plane = int(sys.argv[4])
    except ValueError:
        print("Bit plane must be an integer between 1 and 7")
        sys.exit(1)

    try:
        encode(input_path, output_path, message, bit_plane)
    except Exception as e:
        print(f"Error: {e}")
        sys.exit(1)
Explanation
Convert the Message to Binary
binary_msg = ''.join(f"{ord(c):08b}" for c in message) + '00000000'-
ord(c)converts each character (e.g., 'A') to its ASCII value (65) -
f"{...:08b}"formats it as 8-bit binary ('01000001') -
'00000000'is a null terminator, signalling the end of the message- "This" →
01010100 01101000 01101001 01110011+00000000
- "This" →
Bit Mask Setup
mask = 1 << (bit_plane - 1) inverse_mask = 255 - mask-
These control which bit of the byte we modify:
1 << (bit_plane - 1)shifts 1 left to target the desired bit.
Bit Plane Binary Decimal 1 (LSB) 00000001 1 2 00000010 2 3 00000100 4 ... ... ... -
mask = 0b00000100(for bit plane 3) -
inverse_mask = 0b11111011— used to clear the target bit
Iterate Through Pixels and Modify Bits
for r, g, b in pixels: if bit_idx < len(binary_msg): r = (r & inverse_mask) | (int(binary_msg[bit_idx]) << (bit_plane - 1))-
Let’s break this math down:
-
r & inverse_mask: clears the target bite.g.,
r = 10110110,mask = 11111011→10110010 -
(int(binary_msg[bit_idx]) << (bit_plane - 1)):-
Converts the current binary digit (
0or1) into the correct bit position -
If
bit_plane = 3and bit =1, you shift:1 << 2 = 0b00000100
-
-
|(bitwise OR) inserts the bit- This replaces just 1 bit in the color channel, leaving the rest untouched.
-
The same logic is applied to G and B if more bits remain.
-
Update the Image and Save
img.putdata(encoded_pixels) img.save(output_path)- This writes your modified pixel data back and saves the output image.
Visual Summary (Example for R = 182, bit_plane = 3, bit = 1)
Step Binary Decimal Original R 10110110182 Clear bit 3 10110010178 Bit to embed ( 1)000001004 New R 10110110182 If bit =
0:| Clear + 0 →
10110010| = 178 (b3 cleared) -
-
Copy ,
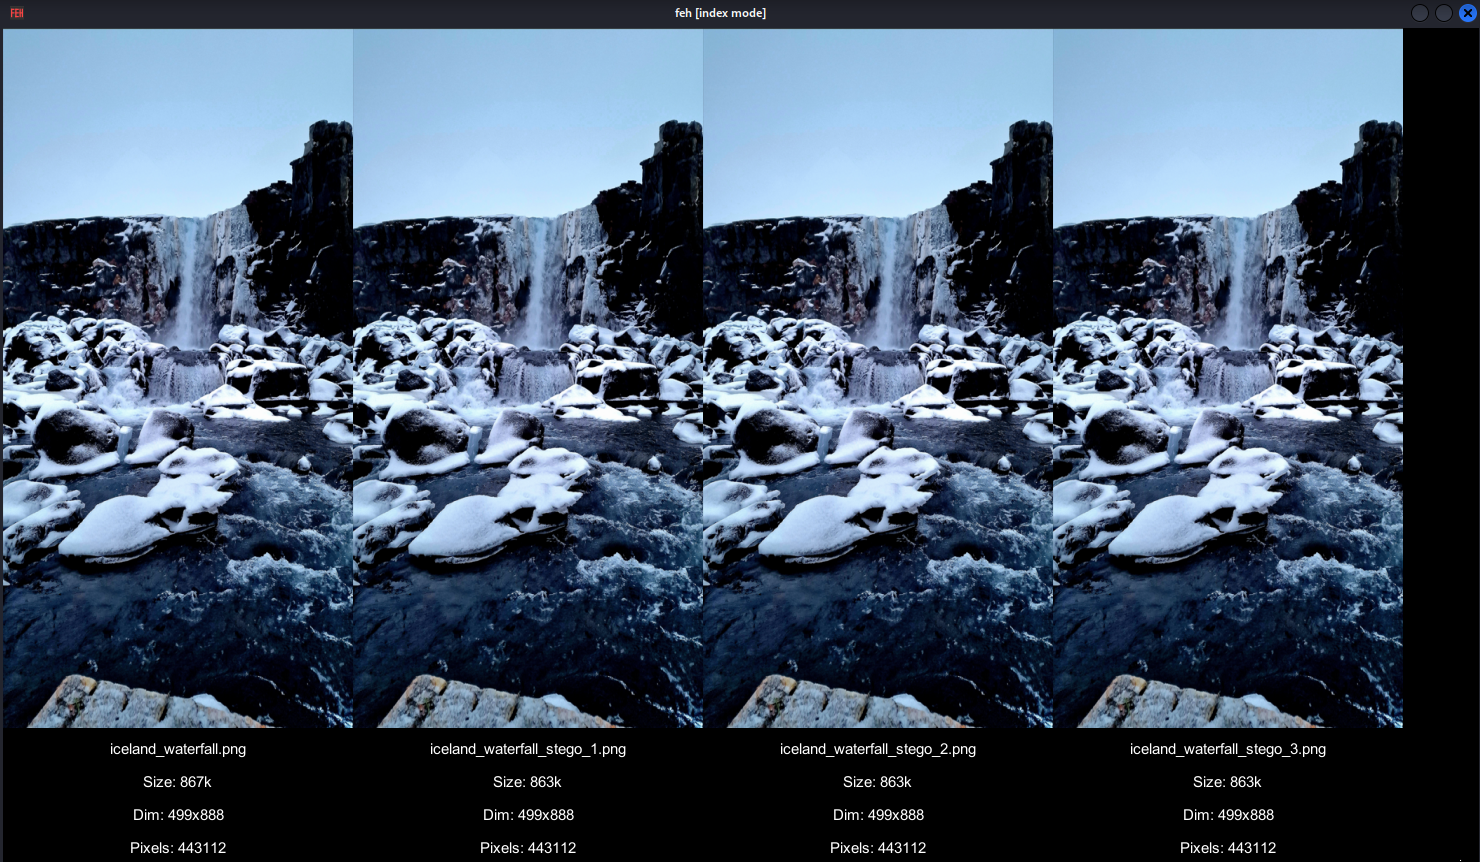
cp, the watefall_image from/opt/gre/steganography_lab/waterfall_image.pngto the current directory and then run the program supplying the file name and other arguments as shown here:$ cp /opt/gre/steganography_lab/iceland_waterfall_image.png . $ python3 encode.py iceland_waterfall_image.png iceland_waterfall_image_stego_1.png "TEST" 1 $ python3 encode.py iceland_waterfall_image.png iceland_waterfall_image_stego_2.png "TEST" 2 $ python3 encode.py iceland_waterfall_image.png iceland_waterfall_image_stego_3.png "TEST" 3python3 encode.py input_file output_file message bit_plane
-
Open images side by side using
-
Now use
pngcheckto check the integrity of the*.pngOutput
OK: iceland_waterfall.png         (499x888, 32-bit RGB+alpha, non-interlaced, 51.1%).
OK: iceland_waterfall_stego_1.png (499x888, 32-bit RGB+alpha, non-interlaced, 51.3%).
OK: iceland_waterfall_stego_2.png (499x888, 32-bit RGB+alpha, non-interlaced, 51.3%).
OK: iceland_waterfall_stego_3.png (499x888, 32-bit RGB+alpha, non-interlaced, 51.3%).

No errors were detected in 4 of the 4 files tested.
The images are structurally valid and pass PNG validation — which demonstrates how well steganography can hide in plain sight, even when tools like
pngchecksay 'OK'Though we know that because we have the original to compare against, we do use the change in non-interlaced by 0.2%.
-
Experiment with
pngcheck, seepngcheck --helporman pngcheckto see what else you can do?
Task 1.2: Reflection
How does bit plane depth affect detectability and capacity?
How does bit plane depth affect detectability and capacity?
Bit Plane = Position Within a Byte
Each pixel color channel (Red, Green, Blue) is stored as an 8-bit number:
Bit positions: [7][6][5][4][3][2][1][0]  ← Bit plane
               MSB                  LSB
-
b1 (LSB): smallest visual impact
-
b8 (MSB): largest impact — most noticeable
Impact breakdown
| Bit Plane | Capacity | Image Impact | Detectability |
|---|---|---|---|
| b1 (LSB) | Low | Imperceptible | Hard |
| b2 | Medium | Barely visible | Medium |
| b3 | Higher | Slight noise | Detectable |
| b4–b7 | Very High | Noticeable artifacts | Easy |
Capacity vs. Quality Trade-off
-
Each pixel has 3 channels (RGB) → up to 3 bits per pixel at b1
-
Want more capacity? → use
b2,b3, etc. -
But: Each jump doubles the impact
Bits Used Max Data (in a 500×500 image) Typical Use b1 only ~93 KB Safe/secret b1+b2 ~187 KB Higher cap b1–b3 ~281 KB Noticeable
Detectability:
Detection tools like zsteg, stegdetect, and statistical methods (e.g. chi-square, RS analysis):
-
Are tuned to spot unnatural patterns in LSBs
-
Higher bit planes (b3–b5) introduce more noise → easier to detect
-
Even visual diffing can expose b3 or b4 usage
Summary
Think of it like whispering into a noisy room:
-
b1 = whisper (hard to detect)
-
b3 = speaking clearly (someone might hear)
-
b6+ = shouting (anyone can spot it)
Part 2: Steganalysis Tools
Task 2.1: Analyze a stego image with zsteg and extract message
So far we have seen the results of enccoding text into images. We should therefore try to extract the text.
-
Using
sto try to extract the message out of bit plane 1,iceland_waterfall_stego_1.pngOutput
imagedata .. text: "\"\"!!JJDFE>(.1==7" b1,r,msb,xy .. text: "QqJ\"q_bx'" b1,b,msb,xy .. text: "2\tK1pyf8p" ...- Repeat for the other two
iceland_waterfall_stego_2.pngandiceland_waterfall_stego_3.png
- Repeat for the other two
Task 2.2 decode.py
-
Let's try and decode this ourselves using a python script will be write, Create a new python file called
decode.pyand reproduce the followingdecode.py, 35 lines
from PIL import Image import sys def decode(image_path, bit_plane): if bit_plane < 1 or bit_plane > 7: raise ValueError("Bit plane must be between 1 and 7") img = Image.open(image_path) img = img.convert('RGB') pixels = list(img.getdata()) bits = [] mask = 1 << (bit_plane - 1) for r, g, b in pixels: bits.append(str((r & mask) >> (bit_plane - 1))) bits.append(str((g & mask) >> (bit_plane - 1))) bits.append(str((b & mask) >> (bit_plane - 1))) chars = [] for i in range(0, len(bits), 8): byte = ''.join(bits[i:i+8]) if byte == '00000000': # NULL terminator break chars.append(chr(int(byte, 2))) message = ''.join(chars) print("Decoded message:", message) if __name__ == "__main__": if len(sys.argv) != 3: print("Usage: decode.py <image> <bit_plane>") sys.exit(1) image_path = sys.argv[1] try: bit_plane = int(sys.argv[2]) except ValueError: print("Bit plane must be an integer between 1 and 7") sys.exit(1) try: decode(image_path, bit_plane) except Exception as e: print(f"❌ Error: {e}") sys.exit(1) -
It is very good that we can encode, we need to be able to decode or it is pointless to encode in the first place. Lets try running
decode.pyoniceland_waterfall_stego_1.png
Task 2.3: What about file --mime-type?
The utility file can tell you what the magic number of the file is. Useful for matching extentsion to the acutal file encoding.
A magic number is a sequence of bytes at the beginning of a file that allows to identify which is the type of a file
For instance the magic number for a png is 89 50 4E 47. Likewise a shell script is 23 21
#! is encoded to the bytes 23 21 which is the magic number of an executable script.
-
Do this quickly, which will demonstrate the above
-
Now you can do two things first run
-
We can look at hex with
xxdtool.
Part 3: Text-Based Steganography
Task 3.1: Use snow to hide a message in a .txt file via whitespace
-
snowhas been packaged and deployed from here https://github.com/CompEng0001/snow -
The program is used to conceal messages in ASCII text by appending whitespace to the end of lines. Because spaces and tabs are generally not visible in text viewers, the message is effectively hidden from casual observers. And if the built-in encryption is used, the message cannot be read even if it is detected.
-
SNOW exploits the Steganographic Nature Of Whitespace. Locating trailing whitespace in text is like finding a polar bear in a snowstorm (which, by the way, explains the logo). And it uses the ICE encryption algorithm, so the name is thematically consistent.
-
Let's look at
snow's man page, read to understand how it works. -
Create a file called
snow_in.txtand fill it with the following:Lorem Ipsum comes from a latin text written in 45BC by Roman statesman, lawyer, scholar, and philosopher, Marcus Tullius Cicero. The text is titled "de Finibus Bonorum et Malorum" which means "The Extremes of Good and Evil". The most common form of Lorem ipsum is the following: Duis aute irure dolor in reprehenderit in voluptate velit esse cillum dolore eu fugiat nulla pariatur. Excepteur sint occaecat cupidatat non proident, sunt in culpa qui officia deserunt mollit anim id est laborum. -
Now use
snowto encodeTESTinto the filesnow_in.txttosnow_out.txt:
Task 3.2: Extract and decode the message
-
Now we try to extract the hidden text from
snow_out.txtfile usingsnow
Task 3.3: Inspect files with cat, and od to reveal anomalies
-
Let's see how detectable stegnography in text is, we will use
odandcatto see what is going on. Find a way to usecatto determine the content of the file, hint you may need to pass in arguments tocat(seeman cat)Output
Lorem Ipsum comes from a latin text written in 45BC by Roman statesman, lawyer, scholar, and philosopher, Marcus Tullius Cicero.$
^I     ^I      ^I ^I  ^I    ^I  ^I ^I ^I     $
The text is titled "de Finibus Bonorum et Malorum" which means "The Extremes of Good and Evil". The most common form of Lorem ipsum is the following:$
    ^I $
Lorem ipsum dolor sit amet, consectetur adipiscing elit, sed do eiusmod tempor incididunt ut labore et dolore magna aliqua. Ut enim ad minim veniam, quis nostrud exercitation ullamco laboris nisi ut aliquip ex ea commodo consequat.$
$
Duis aute irure dolor in reprehenderit in voluptate velit esse cillum dolore eu fugiat nulla pariatur.$
$
Excepteur sint occaecat cupidatat non proident, sunt in culpa qui officia deserunt mollit anim id est laborum.$
We can see that there are extra whitespace and
^Iindicating tabs embedded after the first line. This is the encoded message. -
If you compare this to the original file
snow_in.txtOutput
Lorem Ipsum comes from a latin text written in 45BC by Roman statesman, lawyer, scholar, and philosopher, Marcus Tullius Cicero. $
$
The text is titled "de Finibus Bonorum et Malorum" which means "The Extremes of Good and Evil". The most common form of Lorem ipsum is the following:$
$
Lorem ipsum dolor sit amet, consectetur adipiscing elit, sed do eiusmod tempor incididunt ut labore et dolore magna aliqua. Ut enim ad minim veniam, quis nostrud exercitation ullamco laboris nisi ut aliquip ex ea commodo consequat.$
$
Duis aute irure dolor in reprehenderit in voluptate velit esse cillum dolore eu fugiat nulla pariatur. $
$
Excepteur sint occaecat cupidatat non proident, sunt in culpa qui officia deserunt mollit anim id est laborum.$
Challenge
-
Try and encode/decode messages to each other using just
encode/decode{.py} -
Try to experiment with
snow -
combine snow with encode... could you encode some text as the messsage that is embedded in the each pixel of an image?