GPIO Library Creation and System-Wide Installation Guide (libgpiod Edition)
This workshop details how to set up and use the BeagleBone Black’s GPIO pins with the modern Linux GPIO character device interface.
General Purpose Input/Output (GPIO) pins are special in that they can be configured at runtime to perform in a variety of ways, ranging from simple I/O to serial interfaces to specialized encoder readings. While the BBB supports up to 69 usable GPIO pins, many are consumed by onboard system processes such as HDMI and LCD. This guide explains how to access and control the remaining pins.
We will cover:
- Understanding the BeagleBone Black’s pinout
- Using the libgpiod command-line tools (
gpiodetect,gpioinfo,gpioset,gpioget) - Creating a reusable C library around
libgpiod - Compiling and installing that library system-wide
This guide assumes the BBB is running Linux Kernel 6.12.28-bone25 or newer.
Earlier guides may reference the now-deprecated sysfs GPIO interface (/sys/class/gpio).
That interface was removed from recent kernels.
If you find tutorials using /sys/class/gpio/export etc., they are outdated.
Use libgpiod instead.
BBB Headers and Pinout
The BBB has two 23-pin headers, P8 and P9, giving 92 physical pins.
-
P8_xx refers to the left header
-
P9_xx refers to the right header
-
Odd pins are on the left column, even pins on the right.
-
Some pins are dedicated to power, reset, and ground (e.g.
VDD_3V3,VDD_5V,DGND). -
The remaining pins may be configurable as GPIOs, though many are multiplexed with other subsystems (e.g. HDMI, LCD).
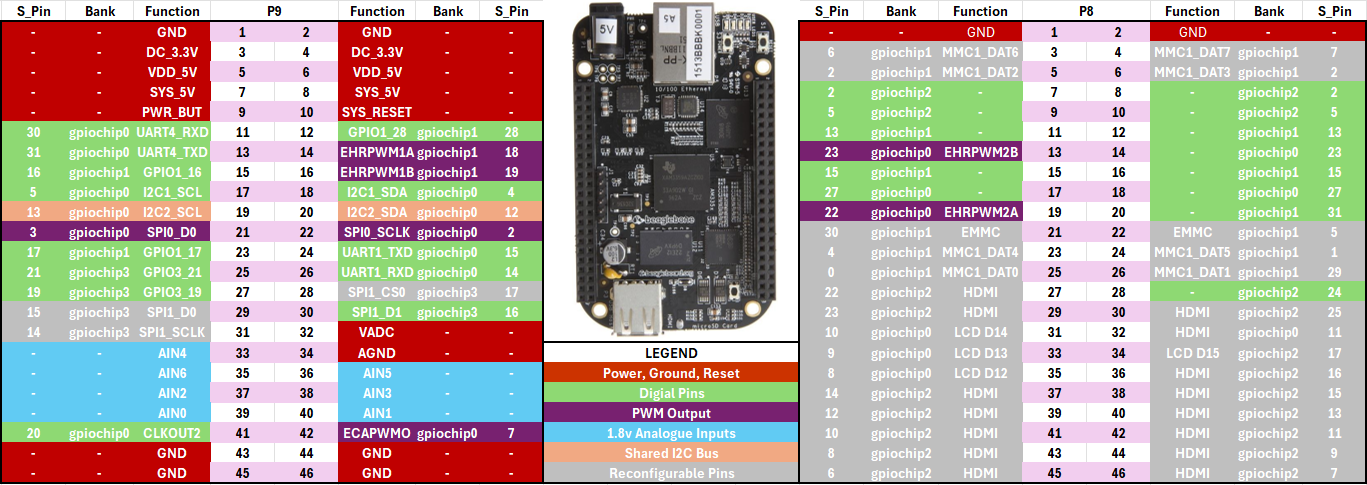
Overloaded Pins
Not all pins are usable as GPIO.
For example, P8_28 (GPIOChip1_24 / GPIO_88) is allocated to the nxp_hdmi_bonelt_pins group by default.
In such cases, the pin cannot be reassigned to GPIO without reconfiguring the device tree overlays.
Step 1: Exploring GPIO with libgpiod CLI Tools
Before writing C code, you can explore GPIO functionality from the shell.
Step 1.1: Detect available chips
-
Use the
gpiodetectcommand in the terminal to find our gpiochips and number of lines
Step 1.2: Inspect pins on a Chip
-
Prints all 32 lines (offsets) and their current direction, consumer, and flags
gpiochip0 - 32 lines:
        line   0: "P8_25 [mmc1_dat0]" unused input active-high
        line   1: "[mmc1_dat1]" unused input active-high
        line   2: "P8_5 [mmc1_dat2]" unused input active-high
        line   3: "P8_6 [mmc1_dat3]" unused input active-high
        line   4: "P8_23 [mmc1_dat4]" unused input active-high
        ...
        line  30: "P8_21 [emmc]" unused input active-high
        line  31: "P8_20 [emmc]" unused input active-high
Step 1.3: Set a pin output (turn LED on)
- Setup an LED ciruit, if set up correctly, your LED will be off:
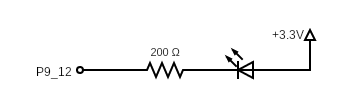
Figure: Active High LED cirucit
-
Run the following command to see that the P9_12 (GPIOChip0 28) is active high
-
Drive chip 0, line offset 28 (P9_12) low.
gpiosetholds the line while running,--mode=timeallows you to set the mode for the chip line totimesleep for a specified amount of time-sspecify the number of seconds to waitgpiochip0is the chip we want28is the offset to get P9_12=0turns signal low&puts the process in the background
Step 2: Creating a GPIO Library in C
While the CLI tools are useful, you often want programmatic access.
We will wrap libgpiod calls into a small C library:
-
bbb_gpio.h: header with public API (bbb_open(),bbb_write(),bbb_read(),bbb_close()) -
bbb_gpio.c: implementation with a lookup table mapping P8_xx / P9_xx to (chip, offset) -
The library is compiled into both a static (
.a) and shared (.so) library for system-wide use.
Step 2.1: Create the Header File (bbb_gpio.h)
-
Create a folder called bbb_gpio with the following sub folders
-
First, create a header file,
bbb_gpio.h, that declares the functions and defines necessary constants and enums in. -
Reproduce the following code:
Suppressed code here [20 lines]...
#ifndef BBB_GPIO_H
#define BBB_GPIO_H

#include <gpiod.h>
#include <stdbool.h>

typedef struct {
    struct gpiod_chip *chip;
    struct gpiod_line *line;
    unsigned chip_index;
    unsigned offset;
} BbbGpio;

bool bbb_lookup_pin(const char *name, unsigned *chip, unsigned *offset);
BbbGpio* bbb_open(const char *name, bool output, int init_val, const char *consumer);
int bbb_write(BbbGpio *h, int value);
int bbb_read(BbbGpio *h);
void bbb_close(BbbGpio *h);

#endif
Step 2.2: Create the Implementation File (bbb_gpio.c)
-
Now, create the src file,
bbb_gpio.c, that has all the functionality etc. -
Next, create the
bbb_gpio.cfile that implements the functions declared inbbb_gpio.h.Suppressed code here [96 lines]...
#include "bbb_gpio.h"
#include <stdio.h>
#include <stdlib.h>
#include <string.h>

// ==== Pin map (fill with your full table) ====
typedef struct {
    const char *name;
    unsigned chip;
    unsigned offset;
} PinMap;

static const PinMap PINMAP[] = {
    {"P8_3",  0, 6}, {"P8_4",  0, 7}, {"P8_5",  0, 2}, {"P8_6",  0, 3},
    {"P8_7",  1, 2}, {"P8_8",  1, 3}, {"P8_9",  1, 5}, {"P8_10", 1, 4},
    {"P8_11", 0,13}, {"P8_12", 0,12}, {"P8_13", 3,23}, {"P8_14", 3,26},
    {"P8_15", 0,15}, {"P8_16", 0,14}, {"P8_17", 3,27}, {"P8_18", 1, 1},
    {"P8_19", 3,22}, {"P8_20", 0,31}, {"P8_21", 0,30}, {"P8_22", 0, 5},
    {"P8_23", 0, 4}, {"P8_24", 1, 1}, {"P8_25", 0, 0}, {"P8_26", 0,29},
    {"P8_35", 3, 8}, {"P9_11", 3,30}, {"P9_12", 0,28}, {"P9_13", 3,31},
    {"P9_15", 0,16}, {"P9_17", 3, 5}, {"P9_18", 3, 4}, {"P9_22", 3, 2},
    {"P9_23", 0,17}, {"P9_24", 3,15}, {"P9_25", 2,21}, {"P9_26", 3,14},
    {"P9_27", 2,19}, {"P9_29", 2,15}, {"P9_30", 2,16}, {"P9_31", 2,14},
    {"P9_41", 2,20},
};
static const size_t PINMAP_LEN = sizeof(PINMAP)/sizeof(PINMAP[0]);

bool bbb_lookup_pin(const char *name, unsigned *chip, unsigned *offset) {
    for (size_t i = 0; i < PINMAP_LEN; ++i) {
        if (strcmp(PINMAP[i].name, name) == 0) {
            *chip   = PINMAP[i].chip;
            *offset = PINMAP[i].offset;
            return true;
        }
    }
    return false;
}

BbbGpio* bbb_open(const char *name, bool output, int init_val, const char *consumer) {
    unsigned chip_idx, offset;
    if (!bbb_lookup_pin(name, &chip_idx, &offset)) {
        fprintf(stderr, "Unknown pin: %s\n", name);
        return NULL;
    }

    char path[64];
    snprintf(path, sizeof(path), "/dev/gpiochip%u", chip_idx);

    struct gpiod_chip *chip = gpiod_chip_open(path);
    if (!chip) {
        perror("gpiod_chip_open");
        return NULL;
    }

    struct gpiod_line *line = gpiod_chip_get_line(chip, offset);
    if (!line) {
        perror("gpiod_chip_get_line");
        gpiod_chip_close(chip);
        return NULL;
    }

    int ret;
    if (output) {
        ret = gpiod_line_request_output(line, consumer ? consumer : "bbb_gpio", init_val);
    } else {
        ret = gpiod_line_request_input(line, consumer ? consumer : "bbb_gpio");
    }

    if (ret < 0) {
        perror("gpiod_line_request");
        gpiod_chip_close(chip);
        return NULL;
    }

    BbbGpio *h = calloc(1, sizeof(BbbGpio));
    h->chip = chip;
    h->line = line;
    h->chip_index = chip_idx;
    h->offset = offset;
    return h;
}

int bbb_write(BbbGpio *h, int value) {
    return gpiod_line_set_value(h->line, value);
}

int bbb_read(BbbGpio *h) {
    return gpiod_line_get_value(h->line);
}

void bbb_close(BbbGpio *h) {
    if (!h) return;
    if (h->line) gpiod_line_release(h->line);
    if (h->chip) gpiod_chip_close(h->chip);
    free(h);
}
Step 2.3: Compile the Object File and Create Libraries
-
Compile
bbb_gpio.cinto an Object File by Using the following command to compilebbb_gpio.cinto an object file (bbb_gpio.o): -
Create a Static Library (
libbbb_gpio.a) to create a static library, use thearcommand:ar: The archiver tool used to create and maintain library archives.rcs: Flags where r inserts the files into the archive, c creates the archive if it doesn't exist, and s creates an index for quick symbol lookup.libbbb_gpio.a: The name of the static library being created.bbb_gpio.o: The object file to be included in the library.
A static library is a collection of object files that are linked into the final executable at compile time. Once linked, the code from the static library becomes part of the executable binary. This means that the executable will carry a copy of the library's code, making it self-contained and independent of the library file after compilation.
-
Create a Shared Library (
libbbb_gpio.so) to create a shared library, use the followinggcccommand:
Step 2.4: Install the Header and Library Files System-Wide
-
You could manually copy the header file to
/usr/includeand the libraries to/usr/lib, or skip to the next section and create aMakefileto do it for you each time.sudo cp bbb_gpio.h /usr/include/ sudo cp libbbb_gpio.a /usr/lib/ sudo cp libbbb_gpio.so /usr/lib/ sudo ldconfigldconfigcreates the necessary links and cache to the most recent shared libraries found in the directories specified on the command line, in the file/etc/ld.so.conf, and in the trusted directories,/liband/usr/lib. On some 64-bit architectures such as x86-64,/liband/usr/libare the trusted directories for 32-bit libraries, while/lib64and/usr/lib64are used for 64-bit libraries.
Step 2.5: Automate with a Makefile
-
Instead of running these commands manually, you can automate the build process using a Makefile.
Suppressed code here [50 lines]...
# Compiler and flags
CC      = gcc
AR      = ar
ARFLAGS = rcs
CFLAGS  = -Wall -Wextra -Werror -O2 -fPIC
LDFLAGS =
LDLIBS  = -lgpiod

# Targets
TARGET_STATIC = libbbb_gpio.a
TARGET_SHARED = libbbb_gpio.so

# Source and object
SRC = bbb_gpio.c
OBJ = bbb_gpio.o
HDR = bbb_gpio.h

# Default target: build both libraries
all: $(TARGET_STATIC) $(TARGET_SHARED)

# Compile the C source into an object
$(OBJ): $(SRC) $(HDR)
    $(CC) $(CFLAGS) -c $(SRC) -o $(OBJ)

# Create static library
$(TARGET_STATIC): $(OBJ)
    $(AR) $(ARFLAGS) $@ $^

# Create shared library
$(TARGET_SHARED): $(OBJ)
    $(CC) -shared -o $@ $^ $(LDFLAGS) $(LDLIBS)

# Clean up build artifacts
clean:
    rm -f $(OBJ) $(TARGET_STATIC) $(TARGET_SHARED)

# ---- Install / Uninstall ----
install: $(TARGET_STATIC) $(TARGET_SHARED)
    sudo cp $(HDR) /usr/include/
    sudo cp $(TARGET_STATIC) /usr/lib/
    sudo cp $(TARGET_SHARED) /usr/lib/
    sudo ldconfig

uninstall:
    sudo rm -f /usr/include/$(HDR)
    sudo rm -f /usr/lib/$(TARGET_STATIC)
    sudo rm -f /usr/lib/$(TARGET_SHARED)
    sudo ldconfig

.PHONY: all clean install uninstall
As long as the Makefile is within directory with the custom gpio c files you can use the make command:
-
Remove static and share libraries from the respective directories
-
To clean up the build artefacts run:
-
To build the libraries and object files:
-
Lastly, use the install command to cp libraries and header to respective root directories:
Step 6: Using the our new libary to control a pin
-
Change directory and
../and make a new directory calledexamples_c/blinkand navigate into it. -
Create a new
.cfile called...blink.cand chose your preferred editor to open it. -
Now we are going to set up the program to use our system wide library and header with
bbb_gpio.h:Suppressed code here [23 lines]...
#include <bbb_gpio.h> #include <unistd.h> #include <stdio.h> int main(void) { // Open P9_12 as output, initial value 0 (off) BbbGpio *led = bbb_open("P9_12", true, 0, "blink"); if (!led) { fprintf(stderr, "Failed to open GPIO\n"); return 1; } // Blink LED 5 times for (int i = 0; i < 5; i++) { bbb_write(led, 1); // LED on usleep(500000); bbb_write(led, 0); // LED off usleep(500000); } bbb_close(led); return 0; } -
We can use this oneliner to compile the code:
-
Alternatively we can use a
Makefilelike before:Suppressed code here [16 lines]...
CC      = gcc
CFLAGS  = -Wall -O2
LDLIBS  = -lbbb_gpio -lgpiod

TARGET  = blink
SRC     = blink.c

all: $(TARGET)

$(TARGET): $(SRC)
    $(CC) $(CFLAGS) $^ $(LDLIBS) -o $@

clean:
    rm -f $(TARGET)

.PHONY: all clean
Invoke make to build the executable:
-
Use the led and etc to wire up and run the code: